Palgue
Bunkai
This is the text of my book
"Palgue Bunkai" illustrating the amazing bunkai of the Korean karate
Palgue kata series.
If you would like a printed
book version or to download it on your Kindle, you can purchase a copy using
the following links:
Or search your local Amazon for "Palgue Bunkai".
I hope you end up being as
excited by the bunkai in this kata series as I am. Enjoy…
Palgue
Bunkai
Decoding
the self-defence syllabus
contained in the
Korean karate Palgue kata series
Copyright © 2020 Pete Cordell
All rights reserved.
This book or any portion thereof may not be reproduced or used in any
manner whatsoever without the express written permission of the author
except for the use of brief quotations with accompanying references.
Revision 15.
Introduction
I gained my 1st
Dan in Korean karate in 2016. Like many new Black Belts, I then asked myself
the question, "what next?"
Gaining your Black Belt
offers you the opportunity to look beyond the syllabus and explore where you'd
like to direct your martial arts energies next. As an aging karateka I was not
going to have a future in competition. I'm still not particularly good at
sparring. So I decided to explore kata. Particularly the Japanese katas that I
hadn't covered in my Korean style.
The Internet, and YouTube in
particular, is a great tool for this type of self-study. As I explored kata
videos I came across many that included in the title the words "… with
bunkai" [Bunkai] (Note: All references at listed at the back of the book).
If you've picked up this book, you will likely know that "bunkai"
roughly means "application". In essence, "what do the moves in
the kata represent".
Exploring the YouTube
comments (not usually a worthwhile exercise!), I came across references to the
work of Iain Abernethy [Jutsu], and from there into the history of karate and
what some call "Applied Karate" or "Practical Karate". This
led me to reflect on the Korean katas that I had already learnt.
In the process of decoding
the Korean katas from an "Applied Karate" perspective I was blown away
by how well the katas were constructed. As far as I can tell, this is knowledge
that has been lost. This felt like a great tragedy and I felt compelled to
write down what I had deduced so that future generations of karateka have the
opportunity to marvel at the genius of these katas' authors as I have done.
Background, Principles and Concepts
But first, let's take a step back. Why is kata a thing and
why do we do it? Let's have a look at a simplified history of karate and kata.
Fighting techniques that evolved into karate emerged in
China and crossed into the Japanese island of Okinawa as a result of trade via
shipping. Many styles developed, with more or less cross-fertilisation on an
ad-hoc basis.
Before YouTube and widespread literacy, the method adopted for
recording fighting techniques was kata. For this reason, kata is often called
the textbook of karate. A key task of an instructor is to mould their students into
a new copy of the style's textbook, and part of the black belt grading is to
ensure that the students are a sufficiently good copy of the textbook. This is
one of the reasons why kata plays such a big part in karate.
Early styles often focussed around a single kata. It was
very rare for someone to know more than two or three. Funakoshi, the founder of
the Shotokan style of karate, is said to have spent three years learning the
kata Kiba Dachi Shodan (similar to the Korean kata Chul Gi and the kata Teki
Shodan) before he was allowed to attempt the next kata in the series.
One of Funakoshi's teachers was Itosu. At the beginning of
the 1900s, Itosu convinced the authorities to introduce karate into schools as
a form of physical education. The focus was put more on physical conditioning,
self-control and discipline rather than pure combat. As part of this, he felt
that the traditional katas were too complicated for children to learn. Legend
has it that he therefore broke the longer, and more difficult, Kusanku (also
known as Kanku Dai) into 5 parts to form the Pinan series of katas. Others
theorise that the Pinan series is based on multiple katas and may even have
multiple authors. Either way, the key innovation is having multiple related
katas instead of one long kata.
Pinan is a Chinese word and Funakoshi changed the name to Heian
to make it more Japanese friendly. He also swapped the order of the first two
katas around as he thought that made for a better progression from easy to
difficult.
This process of simplifying karate and making it accessible
to school children was essential for making karate as popular as it is today.
But it meant that many advanced techniques were put aside, including the deeper
meaning, or bunkai, of the techniques captured in the katas. As children grew
into adults they would start their own karate schools, teaching other children,
and never acquired that advanced knowledge. Hence the skills were lost. The new
teachers were copies of the karate textbook but with the final chapters missing.
Some karateka lament this change of direction. However, I
feel it is similar to being taught how to count before you are taught how to do
partial differential calculus – whatever that is! Karate would probably not have
survived if the change hadn't been made and as a result many karateka would not
have had the opportunity to discover all that karate has to offer. With the
power of YouTube and the Internet we now have the opportunity to try and
rediscover those missing chapters.
But back to the story… A number of Koreans also studied
under Funakoshi. When they returned to Korea, encouraged by various military
authorities, they developed their own variations of the Pinan/Heian katas; the
Palgue series covered in this book being one of them.
When we start trying to understand kata rather than merely
reproduce them, we quickly discover they are like onions: They have layers.
As described by Iain Abernethy [Abernethy], there is the
analysing part (Bunkai/Bunseki) of kata and then there is the practical part
(Oyo). There is also Omote and Ura. Omote and Ura are two sides to the same
medal in the Japanese culture. Omote is the obvious and Ura is the hidden
introverted side.
YouTuber Jesse Enkamp, AKA The Karate Nerd, divides kata
interpretations into Omote, Ura and Honto [Enkamp]. Omote is the surface
interpretation. If a downward block is performed, then a downward block is the
interpretation. Ura means backside, back or reverse. We see it in the kick name
"Ura Mawashi Geri" (Reverse Roundhouse Kick). Here a downward block
can become a strike to the groin. Honto means truth. In this interpretation,
rather than being a block or a strike, a downward block can be interpreted as
something quite different, such as an armlock.
In this book we will be doing Bunkai (analysing) of the Ura
and Honto aspects of the katas' Oyo (application).
Rules
If kata is the textbook of karate then the moves within them
are the words. In the same way that sheet music is a notation for music, the
moves within kata are a notation for fighting moves. The difference between
sheet music and real music is large. The difference between kata moves and real
fighting moves is much smaller. But there is still the difference between the
notation and what they represent, and this must be remembered when interpreting
the kata.
To help with decoding the notation the Gōjū-ryū style of
karate has a set of rules for interpreting kata [Rules]:
Three basic rules - Shuyo san gensoko
1. Don't
be deceived by the shape (embusen) of the kata.
The kata embusen is designed to allow the kata to be
performed within a small space. The shape of the embusen has no bearing on the
meaning of the techniques in the kata.
2. Techniques
executed while advancing are offensive. Those executed while retreating are
defensive.
3. There is
only one opponent and he is in front of you.
Turning to face a new direction while performing the kata does
not mean you are turning to face a new opponent.
Advanced rules - Hosoku
joko
1.
Every movement in kata is significant and is to be used in application.
There are no "salutation", religious or empty
movements in kata. All movements in the kata have meaning.
2. A
closed pulling hand returning to chamber usually has some part of the opponent
in it.
When pulling a hand to the chamber position (such as on the
hip), particularly if it is closed, it should be considered to have some part
of the opponent in its grip. e.g. an arm, wrist or even head.
3. Utilize
the shortest distance to your opponent.
The kata will typically attack the opponent with the
closest part of your body.
4. If
you control an opponent’s head you control the opponent.
Kata techniques often target vital or weak points of the
body (Kyusho), many of the most important of these are in the head. e.g. eyes
or throat.
5. There
are no blocks.
Uke are not blocks, they are "defences", however
in kata they may not even represent defences, but simply be the movements of
the limbs required to execute a more complex technique like a throw.
6. Angles
in kata are very important.
The angle to which you turn represents the angle which you
must take relative to the opponent for the technique to work. It does not
represent turning to face a new opponent.
7. Touching
your own body in kata indicates that you are touching part of your opponent.
In the absence of a partner to practice with, where the
kata touches your own body, you would be touching or holding part of the
opponent's body.
8. Don't
attack hard parts of your opponent with hard parts of your body.
The kata typically strikes hard parts of the opponent with
soft parts of your body and soft parts with hard parts of your body.
9.
There are no pauses in the application.
The rhythm of the performance of kata has no bearing on the
performance of the techniques extracted from it.
Note that Advanced Rule 6, "Angles in kata are very
important", appears to contradict Simple Rule 1, "Don't be deceived
by the shape (embusen) of the kata". Clearly some changes of direction are
more important than others. In the Palgue series, the majority of changes of
direction are simply to fit the kata within a reasonable floor area. What is significant
is each kata contains a number of combinations. Changes of direction often mark
the beginning and end of combinations. Thus a change of direction at the start
of a combination doesn't immediately suggest taking on an angle relative to an
opponent. The new combination represents dealing with an opponent under
different circumstances, not moving on to attacking a new opponent having
completed dealing with the first. Conversely, a change of direction within a
combination typically represents changing position relative to a single
opponent, not moving on to another opponent.
Advanced Rule 5 says "There are no blocks". This
doesn't mean you shouldn't do blocks. Blocks in an application are done on an
as-needed basis. A kata may restrict the options that an opponent has to
counter but it can't anticipate all actions of an opponent. Hence, in an
application you may have to block mid-way through a combination, or even
abandon a combination entirely and start a new one, due to the actions of the
opponent. The exception I make to this is a block at the start of a combination
that directly leads on to a technique that either strikes or controls the
opponent. For example, a block may lead to a wrist grab which is then pulled
back to the hip to restrict the movement of the opponent. In that way, a kata
can tell you that if you find yourself doing a particular block which
techniques follow on fluidly from there.
In addition to No Blocks, I would go further and say in the Palgue
katas "There are no punches". A punch is a fairly unimaginative move.
Punches and elbow strikes can be added into a combination as the opportunities
present themselves (adding dirt as some call it) but in most cases are not
choreographed into a combination. A punch in a kata typically represents
something else – except for the odd occasion when it does actually represent a
punch!
Another important consideration is, as mentioned earlier, kata
is the textbook of karate. Each person that learns the katas is a new copy of
the textbook. They will hopefully go on to teach others to be copies of the
textbook. This means that the katas have to be designed in such a way that they
can be copied time and time again without any loss of fidelity. Those of a
certain age will be familiar with the issue of loss of fidelity caused by
copying from using cassette tapes and photocopying. For example, having a move
that is best performed at an angle of 78.3° to the attacker can't be
represented in the kata so specifically because people are not very good a
measuring such angles with sufficient precision. As more copies of the kata are
made, the represented angle would drift. And you have to remember that the
optimum angle of a technique may depend on the person performing the technique,
the person that the technique is being performed on and even the terrain the
technique is performed on. To address this, the katas round the various angles
to ones that can be more easily represented, such as 90° and 45°.
Shorthand
One thing I have found when reading books on kata is that it
is very hard to follow a kata simply from written words. This book does not
seek to teach the katas, but it is important to be able to know which part of a
kata is being discussed.
To help with this I have devised a simple, concise notation
for various moves in kata. This is as follows:
|
…
|
A pause or space between moves.
|
|
N, S, E, W
|
The direction you are facing
relative to compass coordinates. You always start facing North, represented
by "N". If you left 90° you will be facing West, represented by
"W".
|
|
^
|
Indicates a move forward.
|
|
v
|
Move backwards.
|
|
< or > followed by a
number
|
Turn to the left
("<") or right (">") by the indicated number of
degrees. For example, "<90" means turns left 90 degrees. Bear in
mind that most turns start with the front leg except the 270° turns which
start with the back leg.
|
|
=
|
Ready stance - Chumbi
|
|
\ or /
|
Indicates a forward stance,
either left foot forwards ("\") or right foot forwards
("/"). To understand this notation, imagine you are standing on the
page, looking to the top of the page. Your front foot is positioned on the
top of the symbol and your back foot on the bottom.
|
|
] or [
|
Indicates a back stance, with
back foot pointing left ("]") or back foot facing right
("["). To understand this notation, imagine you are standing on the
page, looking to the top of the page. The bottom of the symbol indicates the
direction your back foot is pointing. Ignore the mark at the top of the
symbol!
|
|
_
|
(Underscore) Horse stance
|
|
DB
|
Downward block
|
|
SB
|
Side block. In our style side
block starts inside and moves to the outside. For example, the left fist goes
first to the right hip and then blocks to the left.
|
|
RSB
|
Reinforced side block
|
|
UB
|
Upper block
|
|
MB
|
Middle area block. In our style
middle area block starts outside and then moves to the centreline of the
body. For example, the left fist starts to the left of the body and then
blocks to the centreline of the body.
|
|
KH
|
Knife hand block
|
|
LKH
|
Low knife hand block
|
|
HF
|
Hammer fist block (similar to
low knife hand but with hands closed)
|
|
SH
|
Spear hand
|
|
PHS
|
Palm heal strike
|
|
IC
|
Inside chop. For example, open
left hand starts at the left ear, is swept outwards then forwards to end with
hand open, palm up at the imaginary opponent's neck.
|
|
OC
|
Outside chop. For example, open
left hand goes to right shoulder, palm down, then swept forward to the
imaginary opponent's neck.
|
|
BF
|
Back fist. In the case of these
katas the back fist is in the vertical plane, striking down
|
|
ES
|
Elbow strike
|
|
Pb
|
Punch body
|
|
Ph
|
Punch head
|
|
FK
|
Front kick
|
|
SK
|
Side kick
|
|
suSK
|
Step up side kick
|
|
r, l, f, b
|
When prefixed to one of the notations
above, Right, Left, Front, Back respectively. It refers to an arm or a leg.
For example, the left arm in a side block position and the right arm in a
downward block position would be described as "lSB rDB"
|
|
ho, hc
|
Hand open, hand closed.
"UB ho" refers to an upper block with hand open (rather than the
normal closed hand). "lUB ho" means left arm in upper block
position with hand open
|
|
*
|
Kiai (Shout)
|
|
?, ?1, ?2 etc
|
A
reference to a note or more detailed description that is explained in
subsequent text. For example:
<90 S UB ?1
?1 = hand open
|
For example, the first few moves
of Palgue Il Jang are represented by:
= N
… <90 W \ DB … ^ / SB … >180 E / DB … ^ \ SB
That all means, start in
Chumbi (Ready stance) facing North. Turn left 90° to face West into a forward
stance with downward block. Move forwards in forward stance with side block.
Turn right 180° to face East into forward stance with downward block. Move
forwards in forward stance with side block.
Where a move is more specific, I just resort to a full
description in curly braces: {}.
Naturally when breaking down a kata I speak about
combinations. Often a combination is performed first in one direction and then
the mirror image is performed in the opposite direction. For the sake of
brevity, rather than saying things like "skipping the mirror combination
and moving onto the combination after that" I simply use the term
"next different combination" or just "next combination".
Hence, in Palgue Il Jang, having performed the initial combination to the West,
I use "next combination" to mean moving onto the combination going
North rather than the mirrored combination going East.
At the start of the
discussion of each combination a small icon is shown. The icon shows the kata embusen
with an arrowhead showing the position of the combination. In addition to
showing where in the kata the combination appears, they also serve as a way of
separating one combination's description from another. At Ready stance (Chumbi)
you start at the bottom of the icon, facing up the page. The icon for the first
combination of Palgue Il Jang is:

You will have noticed that I
have used English names for the various moves rather than the Korean names.
This is so our fellow Japanese karate practitioners can more easily follow the
text.
Website
This book has an accompanying website at http://palgue-bunkai.org.
The YouTube videos and other web links referenced in this book can be more
easily accessed there. It is planned to add additional supporting material over
time.
Club Variations
(Note: The links in this
section are also available at http://palgue-bunkai.org.)
Our club's style of Korean karate was imported to the UK by
American military personnel who had served in Korea.
Korean karate was imported into the US and the West via
other similar routes.
While a key consideration of kata is that it should be possible
to hand it down from person-to-person-to-person, evidence shows that this
hasn't always been successful.
For example, looking at YouTube there are number of
variations of the first kata, Palgue Il Jang.
You would have thought that being the first kata this is
likely to be the simplest and therefore most easy to copy. It seems not.
In our club's execution of Palgue Il Jang there are eight
side blocks and no middle area blocks (as shown in the YouTube video https://youtu.be/27VMrs1VB1c).
Other clubs seem to change some or all of these side blocks into
middle area blocks.
The video at https://youtu.be/_9Fjqw7hf5s shows the
two initial side blocks being replaced by middle area blocks and the rest left
as side blocks.
The video at https://youtu.be/qTfKXbtXAVs shows side
blocks 1, 2, 5, 6, 7 and 8 being replaced by middle area blocks.
The video at https://youtu.be/oxH0ShWGPQg has side
blocks 1, 2, 7 and 8, but middle area blocks in place of side blocks 3, 4, 5
and 6.
And the video at https://youtu.be/aRvz1g4AYBQ shows
all the side blocks replaced by middle area blocks.
Many of the Palgue series katas on YouTube show large, often
arcing, movements to increase the power of the techniques. By contrast our
style has much more of the "feel" of the Heian series katas with
their minimalist, direct movements. As such our style focuses on exploiting the
shortest path to the opponent and prioritises speed over power. Hence some
practitioners of the Palgue katas may, for example, change foot position where
our style does not, and this might affect the perception of how close the katas
match the bunkai presented in this book.
I only describe Bunkai for the style and variations that our
club uses. To me they make sense from the Bunkai presented here. I'll leave it
to others to explore their own club variations. I hope the contents of this
book offers some insight on that quest.
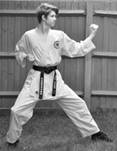
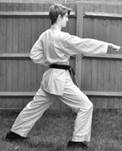
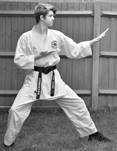
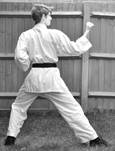
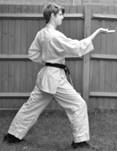
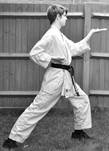
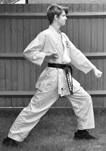
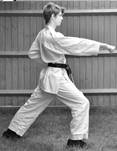
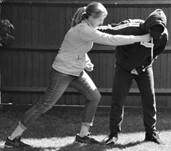
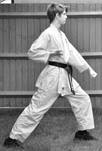
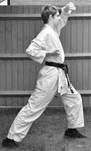
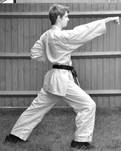
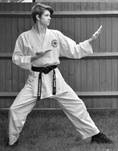
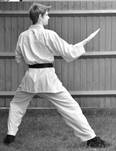
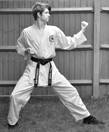
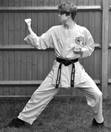
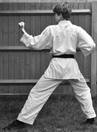
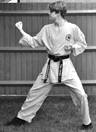
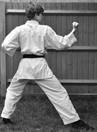
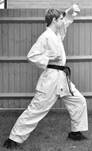
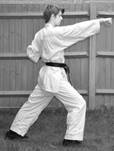
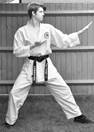
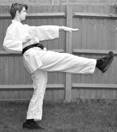
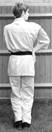
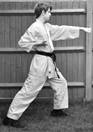
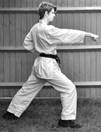
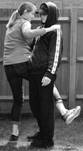
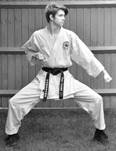
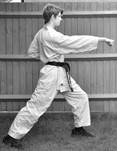
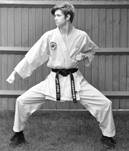
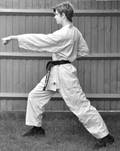
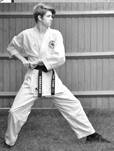
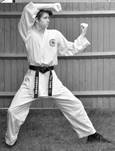
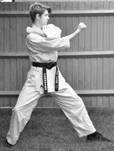
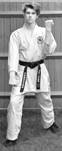
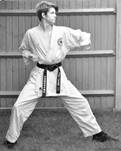
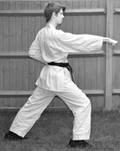
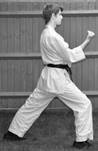
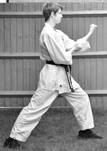
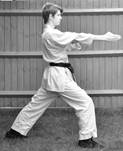
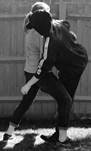
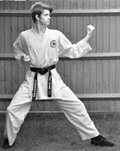
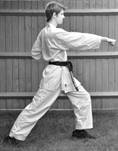
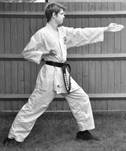
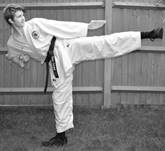
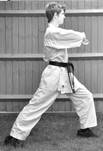
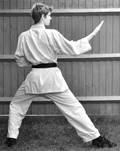
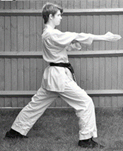
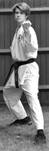
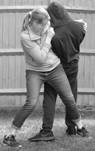
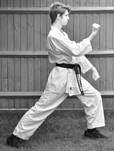
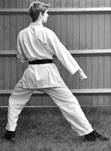
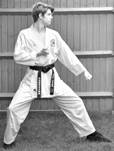
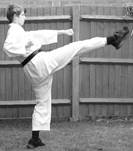
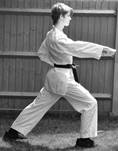
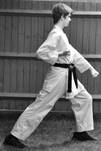
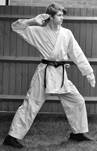
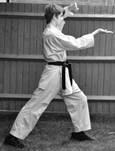
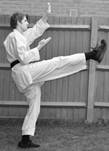
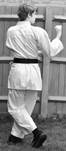
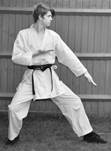
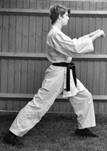
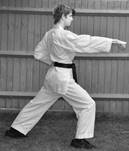
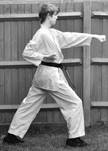
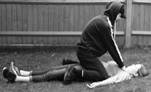
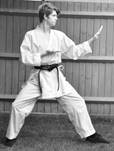
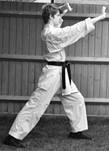
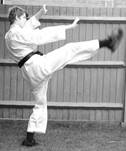
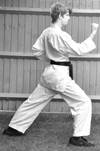
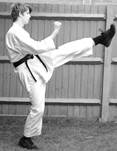
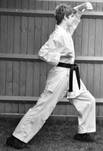
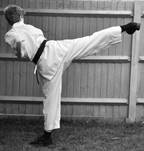
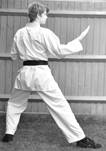
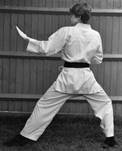
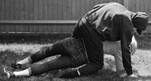
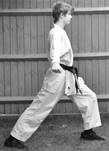
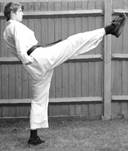
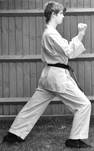
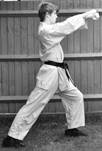
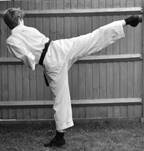
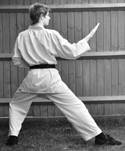
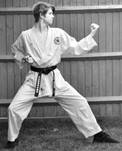
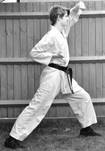
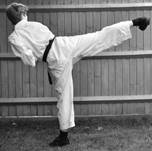
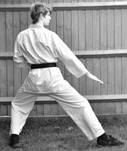
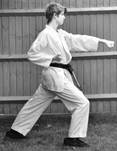
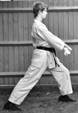
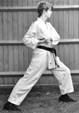
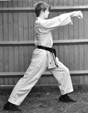
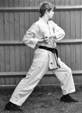
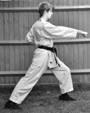
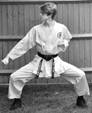
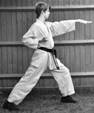
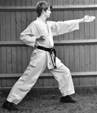
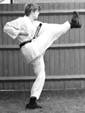
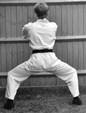
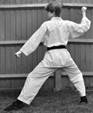
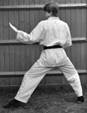
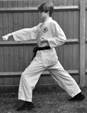
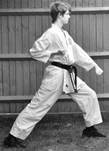
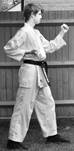
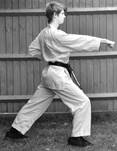
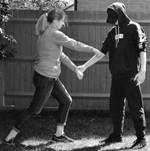
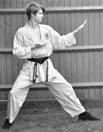
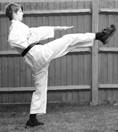
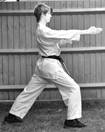
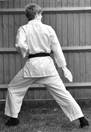
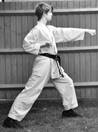
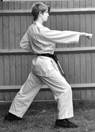
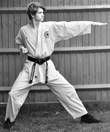
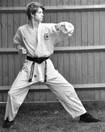
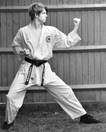
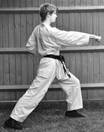
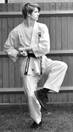
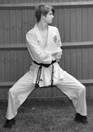
Photos
The photos in the book were taken during the coronavirus
lockdown during which we didn't have access to our regular training hall. This
is why the kata photos are taken on grass and with trainers on.
Acknowledgements
Before launching into the main part of this book I'd like to
acknowledge all the instructors and fellow students that have made me the
karateka I am today. I need to emphasise that this is very much an "off
syllabus" work of my own, so if you conclude that this is the work of a fool
that is no reflection on my association and those mentioned here – other than
that they are prepared to try to teach a fool.
So, thank you Mick, Billy, Paul, Martyn, Cealwyn, Michael, Leonie,
Stuart, John, Jan and Michel.
Special thanks go also to those who volunteered to review
early proofs of the text: Kirsty, Paul, Joe, Diane and Theo. (I hear they are
all recovering nicely.)
Finally I'd like to thank Iain Abernethy. Not only did his
work start me on this path, he was kind enough to offer very speedy feedback on
drafts of this book and suggested adding the photos which have improved the
book immensely.
Palgue Il Jang
The First Kata
Imagine that a student enters a dojang (dojo) and tells the
instructor that they are fed up of being attacked and wish to be able to defend
themselves. Any instructor will know that most people cannot punch well without
instruction and practice. Kicking is even less of an option on the first day.
So what does the instructor do?
The instructor may start by informing the student that the
best form of self-defence is to run away. Actually, this is the second-best
form of self-defence. The best form of self-defence is to not be in a dangerous
position in the first place – situational awareness. Avoid going up dark alleys
where it is known half a dozen people have been murdered in the last month!
But our student persists saying they don't always have the
choice where they have to go and wants answers. So what does the instructor do?

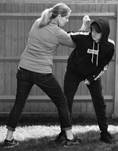
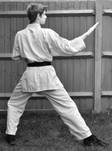
Let's look at the first
combination of Palgue Il Jang:
= N … <90 W \ DB … ^ / SB … >180 E / DB
(From chumbi – ready stance,
turn left 90° to face west into forward stance with downward block, followed by
step forward into side block, followed by a 180° into downward block.)

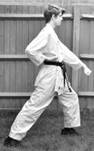
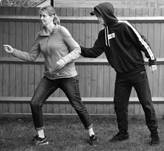
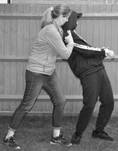
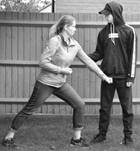
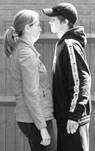
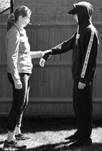
Now imagine the scene… our student is in the streets and
confronted, face-to-face by an attacker. Running away is still an option, so
our instructor advises that, by turning to the right. If this is successful
there is no further techniques required and the kata is complete. Following the
instructions in the kata has been a success.
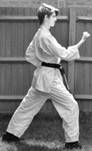
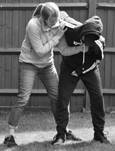
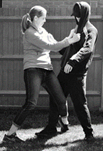
But what happens if running away is not successful? We need
to consider how the attacker stops the student. Likely as the student turns to
the right the attacker will grab the student's left arm or shoulder using their
right hand. If we're lucky, the attacker will step forward with their right
foot.
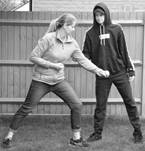
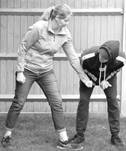
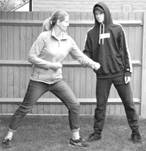
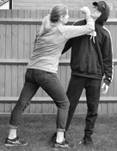
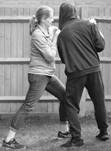
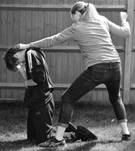
This nicely opens the attacker up for the student to turn to
their left and do a downward block – to attacker's gentleman parts (<90 W \
DB).
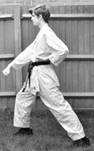
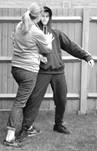
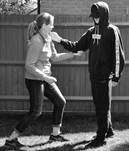
Executed well, the attacker's response to this is reasonably
predictable. Unless he has balls of steel, his reflex will be to clench tightly
with his right hand, firmly holding on to the student's arm, bend over slightly
and twist away from the student.
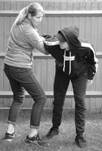
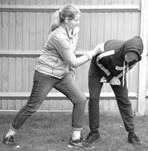
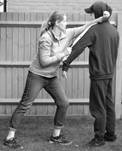
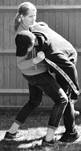
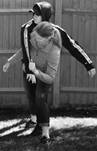
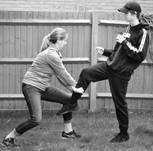
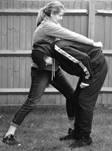
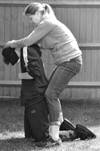
This opens the way for the student's next move - ^ / SB. The
student steps forward, threads their right arm under the attacker's right arm
and brings their hand to grab the attacker's shoulder.
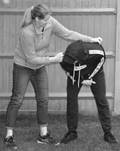
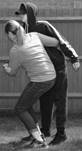
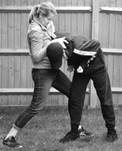
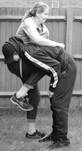
This on its own is not useful, but if the student moves
their front foot back, turning as they do, and pushes down with their right
hand, that is to say >180 E / DB, encouraged by the pain in his lower body,
the attacker will be forced to the ground, and the student can run away. Once
again, the strategy encoded in the kata for dealing with this situation has
been completed, and the technique is a success.

At this point you may be thinking that this is all very well
but rather idealistic. And I'd agree. What could go wrong?
An obvious thing that can go wrong is that the strike to the
crown jewels isn't as successful as the student would have liked - or the attacker
is female. The attacker doesn't bend over so far so the student is unable to
push the attacker down with the turning move. Clearly the fancy kata technique
just described doesn't help here.
But before you start thinking that this kata is a load of rubbish,
I need to quickly remind you that there is more to it.

Let's look at the next different combination:
<90 N \ DB … ^ ] SB … ^ [ SB … ^ / Pb *


The <90 N \ DB part (turn into forward stance with
downward block) is the same as in the first combination. The ^ ] SB part (move
forward into side block back stance) is similar to the first combination, but
because the attacker has not bent over so much the student has to reach further
round to reach under the attacker's arm. The student would try to continue as
they did in the first combination; turning to the right and pushing the attacker
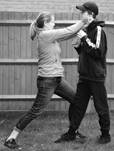
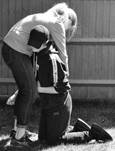
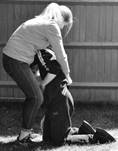
down. But on finding this isn't going to work, the student changes tactic. This
time threading their left arm under the attacker's body and pressing against
the attacker's chest (^ [ SB). This is quickly followed by a strong shove by
the right arm (^ / Pb), pushing the attacker away, allowing space for escape.
(A heel behind the attacker's foot may also help.)

You may be thinking that the second side block and punch is
a weak technique. You need to remember, however, that the attacker will have
been resisting the student's attempt to pull them to the right. As the student
changes from effectively pulling to the right into pushing to the left, the
student will be pushing in the direction the attacker is already trying to go. The
student is therefore able to move the attacker in the new direction with little
effort. This changing direction of the force the student applies is a recurring
theme in the katas. I call it turning "resistance into assistance."
Another thing worth looking at is that in the kata this
combination consists of 4 equal length steps. In application the spacing
between the steps may not be so evenly spaced. The step between the two side
blocks may even involve the right leg stepping back slightly, depending on the
circumstances. To a large degree, the movement of the attacker dictates the
spacing of the steps you need to use, and you need to adapt accordingly. And
unlike in the performance of a kata, to be effective the timing between the
moves is unlikely to be even. The time between the two side blocks may be
relatively long compared to the much quicker timing between the second side
block and the punch (shove). This is an example of Advanced Rule 9, "There
are no pauses in the application". For this reason, for the kata to be
truly useful in practice, it is not sufficient to be able to perform the kata
and know the application "in theory". You need to practice with an
opponent – carefully – and get a realistic feel of the movement and timing.

What else can go wrong? Let's
move on…
<270 E [ KH …
^ ] SB
One reason for not being able to make an effective groin
strike in the earlier scenarios is because the attacker held the student back
by holding their right arm stiff. To counter this, the student needs to strike
the arm before continuing with other techniques. This is done (following the
turn in the kata) with a knife hand to the inside of the attacker's elbow ([
KH). In the kata this is followed by a side block in back stance (] SB). This
is the same application as in the previous combination. Again, the aim is for
the student to get their right arm under the attacker's right arm and either pivot
the attacker around as in the first combination or use "resistance into
assistance" to push the attacker away as in the second combination. The
student will have to decide which as the situation unfolds.


The last combination is:
<90 S \ DB … ^
/ IC … ^ \ IC … ^ Pb *
IC = Inside chop


What's going on here? Well, let's ask our now recurring
question: what problems could we encounter when applying the instructions of
the previous combinations? One problem is that after the groin strike (<90 S
\ DB) the attacker holds their arms so tight to their body that the student is
unable to get their arm under the attacker's arm. To address this, the student
grabs the sleeve of the attacker's right arm (the nearest arm to the student) with
their right hand and twists the hand around to get a tight grip on the fabric (^
/ IC). They initially pull the attacker to their right, rotating the attacker
anti-clockwise, so that they can grab the attacker's other shoulder with their
left hand (^ \ IC) and switch to pulling the attacker to the left to exploit resistance
into assistance. They finish by giving the attacker a strong shove with the
right hand (^ Pb). Hopefully the student will be able to make enough space to
escape.
The kata ends with a repeat of the opening combination (<270
W \ DB … ^ / SB … >180 E / DB … ^ \ SB).
So, that's the moves in the kata. What else can be learn
from it?
A key observation is that as the kata progresses it addresses
different problems that could arise while executing the initial combination.
The ideal combination is presented first, and then subsequent combinations
present variations that could be used if the earlier ones are unsuccessful.
This makes the kata much more practical. Very few fighting techniques work
flawlessly every time. Recognising that and showing the relevant contingencies
is much more useful than showing an unrelated bunch of isolated techniques.
Further, the kata anticipates how the attacker is likely to respond
to the techniques executed by the student. For example, when struck in the
groin, the attacker is likely to move in a particular way or when pulled the
attacker is likely to resist. This demonstrates the real-world, practical
knowledge encoded into the katas.
Palgue Yi Jang
Part 1
Palgue Yi Jang is an important kata, but I fear if I tell
you what it is about at this stage there's a good chance you'll feel it’s a
fudge and you'll lose interest in following the rest of the journey. I want to
try to convince you that the whole Palgue series forms a syllabus before
returning to Palgue Yi Jang. So I'll return to it later when I hope I'll easily
be able to convince you that, not only is it an important kata, but it fits
perfectly within the syllabus.
Palgue
Sam Jang
Can we start yet?
I used to think that Palgue Sam Jang was a boring kata whose
sole purpose was to do moving backwards with side blocks in back stance. The
rest seemed like unimaginative filler just to get to that point. Moving
backwards seemed like a useful new technique but it alone, in my humble
opinion, didn't justify an entire kata. I would consequently perform it with
the lack of enthusiasm that I felt it deserved. However, once you ascribe some
bunkai to the moves it becomes a lot more fun.
The opening combination of Palgue Sam Jang is:
= N … <90 W \ DB … ^ / Pb
A turn to the left with a downward block (DB) followed by a
punch to the body (Pb) -maybe.
The opening move (<90 W \ DB) is the same as in Palgue Il
Jang. Therefore, let's assume the attack on the student starts in the same way too.
Attacker and student are face-to-face. The student attempts to run by turning
to the right but is caught by the attacker. The student's response is also
initially the same as for Palgue Il Jang: They turn to the left and strike the
groin. The attacker responds to this in the same way as before also. They bend
double and rotate away from the student.
The difference now though is that the student is a trained
martial artist. At least in part. Hopefully by now they will have learnt to
punch. Because, for once, what the kata describes as a punch is actually a
punch! But not a punch to the body. The attacker has conveniently turned and
twisted so that their head is in just the right position for what would be a
punch to the body to now be a knockout punch to the chin.

And the rest of the kata? We
have:
<90 N \ DB … ^
/ UB … ^ \ UB … ^ / Ph

We know now that this is likely to cover when the first
combination doesn't go to plan. In this case, when the attacker doesn't oblige
by moving their head to a suitable position for the knockout blow after the
groin strike. (Or the student is not in a position to execute a groin strike,
in which case the downward block is a grab and pull down of the attacker's
right wrist.) We also know that that upper block is unlikely to really be an
upper block because the kata rules say so. And it's too boring. So…
It starts with the usual downward strike to the groin. This
time the strike is ineffective, and the attacker remains mostly upright. The
student then is advised to strike high – in other words, to the head – with an
upper block type motion.
Why this upper block type motion instead of regular punches?
For starters, we saw that karate has a rule that you should
strike hard targets with something soft and soft targets with something hard.
If you strike a hard skull with a hard fist, especially an unconditioned fist,
you are likely to hurt your fist more than you hurt the other person's face.
It must also be remembered that a fight is a chaotic
situation. Adrenaline is likely to be running high and even a practiced fighter
is unlikely to operate at their best. As the target for a knockout blow to an
attacker's head is quite small and a fist is also quite small, the chances of a
successful punch to the chin or similar target in such a fast moving, chaotic
situation ends up being very small. Using the whole fist AND forearm increases
the chances of a successful hit. The target is also broadened to the neck area
and under the chin. Why this area? Other than it being a large target, the neck
is a relatively delicate area. There are nerves running down the side that are
sensitive and many have consequences beyond just causing pain. Striking the
neck veins and arteries can convince the brain that the attacker's blood
pressure is too high leading to the heart rate being reduced and from that to fainting.
And it's still possible to strike the jaw which can lead to a knockout.
Another consideration is that the range of distance over
which the technique can be applied is much larger than for a regular punch. At
the longest range, fingertips to the eyes can be used. At the shortest,
striking up under the chin with the forearm can be used. Adapting between these
two extremes is easy compared to, say, switching from a straight punch to a
hook.
The striking upwards nature of the upper blocks also works
well for a shorter person defending against a taller attacker.
The upper blocks as strikes therefore make a lot of sense.
The combination has two upper blocks followed by a punch to
the head and the combination ends. So is that what we should do in a real
situation – two upper block strikes followed by a punch to the head and then
stop? If a punch to the head wasn't a good idea two moves ago, why is it a good
idea now? Maybe we have to entertain the idea that, like in Palgue Il Jang, this
punch is not a real punch? If so, what could it mean? Well, at this point the
student can't just stand there. Nor have they got to a situation where they can
run away. So they have to continue doing something. And the most obvious
something is the something that they were already doing. In other words, carry
on using upper block style strikes to the neck and head for as long as they
can. The odd palm heel strike or punch to the body could also be added in just
to mix it up (adding dirt) but the general message, the message conveyed by the
punch to the head, is to keep striking the neck and head using upper block motions.
Before leaving this combination, we can gain some insight
into why in Korean karate the blocking arm goes inside the returning arm on an upper
block. This is different to a Japanese rising block where the blocking arm goes
outside. In the scenario used in this combination, the non-blocking arm, the
arm that is going back to the hip, can be used to pull the attacker's arm out
the way, clearing the way for the strike with the striking arm. This is an
excellent example of the general principle of hikite or "pulling
hand" mentioned in the kata rules presented earlier.
Which leads to the point that, even though the kata first
strikes with the right arm and then the left arm, the kata isn't mandating that
the student has to keep alternating the striking arm. If the student has hold
of one of the attacker's arms they can keep repeatedly striking the attacker
with the arm that is not holding the attacker.

What of the subsequent combinations in the kata? The student
has no reason to unilaterally change strategy from striking the attackers head.
So the remaining combinations must depend on what the attacker does. What
options does the attacker have aside from running away or falling unconscious?
If you were being repeatedly struck on the head what might you try to do?
The first option the attacker has, and the preferred option
from the student's point of view, is to try to stop the student hitting their
head. This can be done simply by raising their arms. How can the student
respond to this? How about:
<270 E [ KH … ^ ] KH
The student can use knife hands. To do what? To strike the
attacker's body. Why not regular punches? Again, there's the versatility of
working at both long and short range. With practice, considerable power can be
loaded into such strikes. Aiming the strikes at the floating ribs on the sides
of the torso will add to the effectiveness. The waist is relatively weakly
protected with muscle compared to the abdomen. And you can sneak in a few
regular punches just to spice things up if you like.
The student doesn't have to execute perfect back stances
when doing these strikes. Adopting a strong horse stance-like stance and
rotating the shoulders so they move in much the same way as if regular knife
hands were being done is equally effective for striking but more efficient and
faster. This is best practiced with a punch bag than a live partner.
As before, the student should keep executing such strikes
until they no longer can. For example, when the attacker lowers their arms to
protect their body. In that case the student would revert to the upper block
style strikes to the head as before.


What other options does the attacker have to counter the
student's strikes? What does the next combination suggest?
<90 S [ SB … >180 ] SB … v [ SB … v ] SB …
v [ SB … >180 ] SB

There are two clues to what is going on here. The 180° twist
and moving backwards.
Both signal a switch from an attacking mode to a defensive
mode. The option the attacker has taken to being repeatedly struck is to counterstrike.
In this combination the kata is telling the student that
when the attacker is attempting to strike they should try to block outwards. I
have seen YouTube videos of other club variations of Palgue Sam Jang where they
perform middle area blocks (blocking inwards) in this combination. I believe
that our style's recommendation of blocking outwards with side blocks is better
because you can more quickly transition to a counterattack. It's just a
continuation of the rotation of the body. The outward block also more readily
allows for grabbing and controlling the attacker's arm and then reverting to striking
with the other arm. Alternatively, the blocking arm can readily transition to a
snap punch or upper block style strike.


Which leads us to the last
combination:
<90 W \ UB … ^
/ Ph
This is instructing the student to do just such a counterattack.
Blocking merely buys a bit of time. And even then, only if it's successful. The
punch head here is a reference to the punch head in the earlier upper blocking
combination. In other words, revert to attacking the attacker's neck and head
area using upper block style strikes as soon as you can and keep going.
In summary, Palgue Sam Jang is a striking kata.
Palgue Sa Jang
It's all in the knees
The key to understanding Palgue Sa Jang is the bent knees
when the feet are together in the northwards going second different
combination.
Bending your legs is a recommended practice for a very
common everyday activity. If you don't do it, you can hurt your back. What is the
activity in question? It's lifting things. In a fight situation there are only
a limited number of things you might consider lifting. One is your attacker.
And the main reason to lift your attacker is to throw them.
Let's skip the first
combination for the time being to look at the relevant combination in more
detail.
Heading north, it's:
[ KH … FK / SH …
<90 ?1 … <270 \ ?2 … ^ / Pb *
KH = Knife hand
FK = Front kick
SH = Spear hand
?1 = Front foot drawn back so feet are side-by-side, pointing west.
Right hand on hip, palm outwards, Left hand in the armpit, palm down.
?2 = Left foot moved backwards (eastwards), then northwards, twisting to
front stance, while left hand is swung in the horizontal plane as a fist.

The initial scenario is the usual one. The attacker has
stepped forward with their right leg and, using their right arm, grabbed the
student's left arm.
The student moves their right leg towards the attacker, with
the foot pointing to the right. They then bring their left leg between the
attacker's legs and position it just behind the attacker's right leg,
immediately pushing the attacker away with both hands ([ KH). It is the judo
throw Ōuchi-Gari.
If successful, the student can retreat at this point. On the
other hand, if the attacker merely stubbles back a bit, recovers and then
advances towards the student, the next part of the combination comes into play.
This next bit is one of the biggest bits of notation in the
whole kata series. Remember Kata Rule 7: "Touching your own body in kata indicates
that you are touching part of your opponent"?
Think of how a spear hand ends. The karateka ends up with
their left hand underneath their right elbow. The "own body" that is
being touched is the elbow. The spear hand is saying, "with your left hand,
grab the attacker's right elbow."
That front kick? Would you be surprised if I said it's not
actually a kick? It actually means "take a big step forwards!"
Which means so far we have got: use your left hand to grab
the opponents right elbow and step inwards. This is followed by pivoting and
lowering with bent knees. At this point the student is positioned with their
right hip in contact with the attacker.
The right hand that in the kata is placed on the karateka's
right hip is actually wrapped around the back of the attacker and grabs a
similar place on the attacker's hip.
The horizontal hammer strike that pulls round in the
horizontal plane as the student rotates is pulling the attacker's right arm and,
with it, their body over the student's hip to execute a hip throw. The judo
throw O-Goshi.
Interestingly (to me!) there is evidence in our association
that in the earlier days, rather than the first turn being 90° left so that the
feet point west, the turn was 135° so that the feet pointed south-west. This
would tie in even more closely with the O-Goshi hip throw wherein the student's
right hip is pushed into the attacker.
Hopefully this time the throw has worked. But there are two
ways the attacker can thwart it. They can rotate around the student's hip so
they end up facing the student or they can slide over the student's hip so they
end up facing away.
The first case is covered by the "^ / Pb" moves –
the student steps forward placing their right leg behind the attacker's right
leg, sweeps their leg back and pushes forward. This is the judo throw Osoto
Gari.

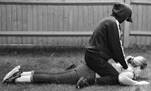
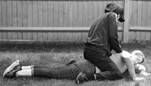
The second of the two cases
mentioned above is covered by the combination at the end of the kata:
_ lDB … {step
out} \ Pb … {moving to the right} … _ rDB … {step out} / Pb
_ = Horse stance
lDB = Left arm downward block
rDB = Right arm downward block
That's the same sequence performed for both the left and
right sides. Which is executed depends on where the attacker ends up in
relationship to the student. The more likely is that the attacker ends up to
the right of the student which will mean the second half of the combination is
used. Here the attacker has slipped over the student's hip and is standing
facing away from the student, to the student's right. The student drops down so
their right leg is behind the attacker (Horse stance). At the same time the student
puts their right arm in front of the attacker (rDB) and pushes the attacker
backwards over their outstretched leg, pivoting their body round to assist by
pushing with their left arm ({step out} / Pb).

You'll recall that the
combination that we initially described is duplicated later in the kata while
moving south on the return journey. Except this time, rather than the
karateka's right hand being placed on their hip when the legs are bent, it is
placed on their cheek. Everything else is the same. A hip throw is being described
again but this time the attacker's right arm is captured in the fold of the
student's right elbow. It is the throw Ippon-Seoi-Nage.
On our rather random
walkthrough of this kata we still need to describe the opening combination:
= N …
{both fists placed on right hip} …
<90 W [ lSB rUB …
{left arm pulls in} {right arm punches out} …
{left foot draws in} {left arm chops out} {right arm goes to right
hip}
lSB = Left
arm side block
rUB = Right arm upper block

This combination can describe a surprising number of
techniques, for example, involving hair grabs and arm locks. But we have
determined that Palgue Sa Jang is about throws and therefore we must find a
throw for this combination.
In Master Funakoshi's book "Karate Dō Kyōhan" [Kyōhan] he illustrates two candidates: Kata-Sha-Ra
(Shoulder Wheel) and Gyaku-Zuchi (Upside-Down Hammer). The two are very
similar.
The context is the same as we have had before… the student
has attempted to run away but the attacker has stepped forward with their right
foot and grabbed them. In this case the attacker has stepped sufficiently far
forward that they are almost side on to the student.
The student moves their hands to their right hip, ducks down
under the right arm of the attacker and moves behind the attacker. The
student's right hand comes up, grabbing around the attacker's neck. Their left
hand grabs the attacker's left leg. Rotating both arms clockwise, the attacker is
lifted and rotated, potentially being dropped on their head.
If the attacker does manage to avoid going down by balancing
on one leg, the student pulls the attacker's held leg to the left while drawing
back their left foot to sweep away the leg the attacker is standing on ({left
foot draws in} etc).
Thus we see Palgue Sa Jang is a kata about throws that
manages to cover quite a bit of the early part of a Judo syllabus.
Palgue Oh Jang
Moving forward
When we moved from Palgue Sam Jang to Palgue Sa Jang
something significant happened from a combat perspective. When we move from
Palgue Sa Jang to Palgue Oh Jang that change is repeated.
When we moved from Palgue Sam Jang to Palgue Sa Jang the
distance to the attacker was reduced. As we move to Palgue Oh Jang the distance
is reduced again.

With the initial combination
(move!) in Palgue Oh Jang we start close to the attacker. Really close. Face-to-face,
chest-to-chest.
The combination is:
= N … v / lSB rDB
lSB = Left arm
side block
rDB = Right arm downward block
As the attacker attempts to assert their authority by
bumping their chest into the student, the student grabs the top of the
attacker's right leg with their left hand and behind the attacker's neck with
their right hand. The student steps back with their left leg (v /) and rotates
the attacker over what is now their outstretched right leg (lSB rDB).
This is a very quick combination that benefits from surprise
in its application and many of the techniques described in this kata are
similarly short.
We've moved onto body drops where we send the attacker to
the floor without lifting their feet off the ground like we did with the throws
in Palgue Sa Jang.

The second combination,
heading West, is:
<90 W [ LKH …
^ ] KH … v [ ?1 … ^ / Pb
LKH = Low knife
hand
?1 = {left arm in horizontal L shape, upper arm pointing west}
{right fist on hip}

We're back to our regular attack scenario. On being caught
the student does a powerful low knife hand to the attacker's gut ([ LKH). This
causes the attacker to bend over.
The next two moves (^ ] KH … v [ ?1) work together as one.
After moving their right leg forwards the student swings their arms over the
top of the attacker's bent back (] KH) then grabs the attacker's hair (or
something similar) with their right hand and the top of the trousers or belt
with their left hand. The student continues by trying to pull the attacker to
the ground (v [ ?1). If the attacker resists and the move fails, the student
places their right foot behind the attacker's right leg and pushes them
backwards over it (^ / Pb). More resistance into assistance.


The next different combination is:
<90 N \ lDB rSB
… ^ / RSB … ^ \ RSB … ^ / SH
RSB = Reinforced
side block
SH = Spear hand

The first move of the combination (\ lDB rSB) is just a
repeat of the first move in the kata. Another rotation of the attacker over the
knee, just moving forwards instead of backwards.
The two reinforced side blocks (^ / RSB … ^ \ RSB) are the
same technique, just repeated for both sides. When close to the attacker, the
student positions their right wrist on their left hip while placing their right
foot behind the attacker's left leg. The student then pushes the attacker with
their right forearm, reinforced by the left arm, over their lower leg.
The move is repeated on the other side (^ \ RSB).
The spear hand gets more interesting. We've already met it
in Palgue Sa Jang and it has the same meaning here: "With your left hand,
grab the attacker's right elbow." An odd move with which to end a
combination!
That's because the sequence actually continues into the next
combination. Let's look at that:

<270 E [ SB …
{step out} \ rPb … lPb … ?1 suSK … \ ES … ^ ] KH
?1 = Hold left
arm out with palm open, little finger down
suSK = Step-up side kick
ES = Elbow strike

The sequence with the knife
hand then becomes: ^ / SH … <270 E [ SB.
The student steps forward to place their right foot in front
of the attacker's right leg and, with their left hand, grabs the attacker's
right elbow (^ / SH). The student rotates anti-clockwise, holding their left
arm high, to drop the attacker over their out-stretched right leg (<270 E [
SB). This is the Judo technique called Tai-Otoshi, meaning "body
drop".
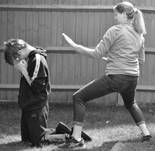
The next technique starts with the double punch, first right
then left (\ rPb … lPb). It is perhaps my favourite in all the katas. This is
because it's a technique that pretty much every kid has done in the school
playground and here it is encoded into a martial arts kata.
Student and attacker start face-to-face (achieved by the
{step out}). The student reaches out with their right hand to grab the
attacker's left shoulder (rPb). They pull the attacker's left shoulder towards
them and push the attacker's right shoulder away from them using their left
hand (lPb). The attacker's shoulders are now at an angle to the student. The
student first steps up with their right leg and then places their left leg
behind the legs of the attacker (?1 suSK). Pushing with their left hand and
pulling with their right, the student rotates the attacker's shoulders
clockwise, pulling the attacker over their outstretched left leg (\ ES). As I
said, the most basic body drop in the whole world, familiar to every child,
encoded into a karate kata. How fandabidozi is that!
Hopefully it is enough to send the attacker to the ground.
However, if the attacker does manage to step over the outstretched leg, the
student moves their right leg behind the attacker's repositioned legs and does
a knife hand action to attempt to drop them again (^ ] KH).


The final combination in
Palgue Oh Jang is:
<90 S \ lDB
rSB … ^ ] HF … ^ [ HF … ^ / Pb
HF = Hammer fist
As before, the <90 S \ lDB rSB is just a reiteration of
the earlier technique.
The hammer fists are like a low knife hand but with fists
closed. As we have encountered low knife hands without fists closed earlier in
the kata, it suggests that this difference is important here.
Most of the time when we have used knife hand or low knife
hand we've been pushing or striking with the forearm. This time it's different.
The closed hands indicate that this time we are grabbing something. A shoulder
is good but grabbing hair or something similarly motivating when pulled is even
better.
Putting the pieces together, the attacker is in a left leg forward
stance, the student steps well behind the attacker with their right leg,
grabbing the attacker's hair with their right hand as they do. The technique is
completed by pulling the attacker's head back so that they fall backwards over
the student's outstretched leg (^ ] HF).
In conclusion, Palgue Oh Jang has a lot of short techniques
focussed on body drops for situations when the attacker is at close range where
punches and even twisting for throws is not possible.
Palgue
Yuk Jang
It's all downhill from here
I'm so glad you made it this far in the book. Those that
haven't have missed out on a real gem of karate.
Palgue Yuk Jang is the kata that I hope will smash any
lingering doubts you might have about the series forming a syllabus. I
mentioned in the introduction that you could look at kata in a number of ways; omote,
ura and honto. Palgue Yuk Jang takes honto to 11 and yet the application is
practical and works beautifully. Not only does each combination work perfectly,
but the sequencing of the combinations is perfect and the kata itself fits perfectly
in with the other katas in the series. It's practically perfect in every way.
But enough excitement and superlatives for the time being.
We need to look at the kata.
The first thing to ask about Palgue Yuk Jang is, "what
purpose does this kata fulfil?" We started with a safe kata that didn't
need any punching techniques, on to a kata that used striking techniques at the
maximum possible range. We moved closer with throws, then moved face-to-face to
use body drops. We can't get any closer to the attacker. Where can we go now?
Things can only go downhill from here.

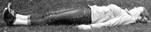
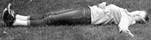
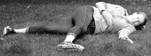
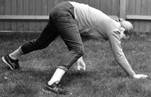
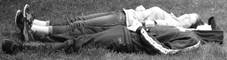
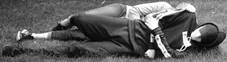
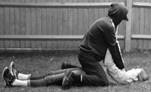
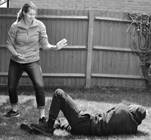
I invite you to lay on the
ground on your back and execute the first combination of Palgue Yuk Jang:
= N … <90 W [ KH … FK / … rPb
From laying on your back, performing the knife hand (KH) throws
your arms to your left. Having rotated your arms, the front kick (FK) throws
your right leg to the left and rotates your upper body to the left also. Now
the punch body (rPb). We're now wise to the fact that this may not be a real
punch. Often it's just a push. What have we got to push against in this
context? The biggest thing we can push against is planet Earth. This will push
our body up.
Thus, bearing in mind that this is the first combination in
the kata and thus the preferred option, the message of Palgue Yuk Jang is,
"if you end up on the ground, the best thing to do is get back up on your
feet."

Let's continue putting our faith in the principle that the
kata starts with a combination describing the best situation and subsequent
combinations deal with increasingly less desirable situations. Which leads to
the question, what is the next best situation? How about, you are on the ground
but the attacker is also on the ground? They're sufficiently near to you that
you can't get up as described in the first combination. Does the next
combination describe this? The combination is hard to describe in words, but
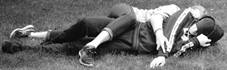
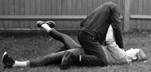
the gist of it is:
<90 \ N DB … lUB
ho rIC … FK … {X stance, left leg behind right} … BF *
lUB ho = Left
hand upper block with hand open
rIC = Right hand inner chop
FK = Front kick
BF = Back fist, striking downwards
We start with attacker and student laying side by side on
the ground. The student can't roll over and get up because the attacker would
grab them. In this case the attacker is laying to the left of the student. If
the attacker is on the other side the mirror of the combination has to be performed.
The student starts by striking their left arm down onto the
attacker (DB). This is to encourage the attacker to roll away from them. The
student rolls towards the attacker so that both are on their left sides. The
student stops the attacker rolling any further by using their left hand to hold
the attacker's right shoulder (lUB ho) and reaches over the attacker's body
with their right arm to grab the attacker's right arm (rIC). The student
follows this by throwing their right leg over the attacker (FK).
If the student is close enough to the attacker and doesn't
mind causing the attacker some mild discomfort, they can pull on the attacker's
right arm and raise themselves up into a standing position. They draw their
left leg in behind the attacker's shoulder and place the attacker in an arm
lock ({X stance, left leg behind right} … BF). The attacker is then controlled.
If the student is not able to get on to their feet then an
arm lock can be applied while both student and attacker are on the ground. This
is less desirable as there is no route of escape and the student is vulnerable
to being attacked by an accomplice of the attacker.
In fact, there are a number of variations that this
combination can be applied to. This is an example of the kata showing a
principle and the karateka being expected to experiment and apply it to
slightly different scenarios, such as the attacker's head being in the opposite
direction.


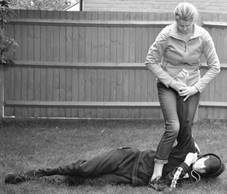

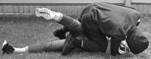
Can things get worse? There is more kata so I guess they
can. The next combination is:
<270 E [ LKH … {step out} \ ?1 … {Right hand
to hip} rFK / … rPb … lPb
LKH = Low knife hand
?1 = Double side block ending with fingers on fists facing forwards
rFK = Front kick
rPb = Right punch body, lPb = left punch body
The scenario? Well, the attacker could be closer to the
student. Does the attacker sitting on top of the student with their hands on
the student's neck match the combination? Let's look.
The low knife hand (LKH) could take the student's arms between
the student and the attacker.
The double side block brings the student's hands inside the
attacker's arms and then places them on the attacker's upper arms.
So far, so good.
Pulling back with the right hand ({Right hand to hip}) pulls
the attacker to the right-hand side. The front kick (rFK) adds weight to the
student's pulling motion.
This might pull the attacker off to the right, but the
attacker will likely resist it. At this point the student uses resistance into
assistance by using their right arm to push (rPb) and their left arm to pull
(the hikite of rPb) the attacker to the left. As the attacker is already trying
to go in this direction they are easily pushed over, and the student ends up on
top of the attacker.
The student ends by pushing themselves up with their left
arm (lPb) to a standing position. (Now you know why you do all those
press-ups!)
In conclusion: the combination fits perfectly.
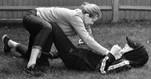

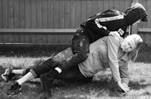
There's one more combination. How can things get worse? It
took me an embarrassingly long time to work this one out until the blindingly
obvious finally hit me. Instead of the student being face-up, the student is now
face-down; with the attacker sitting on their back. That sounds worse. The
student can no longer grab the attacker, so a different combination is required:
<90 S [ KH … \
lUB ho rPHS … rFK / … BF … lFK \ UB … rSK * ] KH … <180 N [ KH
lUB ho = Left arm
upper block, hand open
rPHS = Right arm palm heel strike to head
rFK, lFK = Right leg front kick, left leg front kick
BF = Back fist, striking downwards
rSK = Right leg side kick
The student moves their arms above their head ([ KH), pushes
their right side up with their right arm (rPHS) and assists with their left arm
which is under their head (lUB ho). This is the start of trying to slide the
attacker off to their left. The right leg is drawn in and used to further aid
the rotation (rFK).
As usual, the attacker will resist this. It's time to use
our old friend "resistance into assistance". With speed the student
collapses their right arm, rotating clockwise so that now their left shoulder
is raised (BF). This time the left leg is drawn up to further aid the rotation
(lFK). The left arm is raised to push the attacker off (UB). The student is
now roughly in a side plank position on their right elbow with left arm pushing
the attacker off. The student draws in their right leg (rSK) and with this leg
and both arms (KH) pushes themselves to a standing position. All being well the
attacker is on the ground behind the standing student. The student completes
the technique by turning to face the attacker with the final knife hand (KH).
They can then make their escape.

I promised you honto to 11 and I hope you feel you got it. As
I said earlier, in my mind the application of each combination fits perfectly.
Each combination progresses from best (of a bad!) situation to less desirable
situations beautifully. And the kata fits perfectly into the sequencing of the
other katas.
This cannot just be coincidence. Thus in my mind Palgue Yuk
Jang is the key piece of evidence that the katas form a coherent syllabus and are
not just a collection of random techniques.
Palgue
Chil Jang
Are we there yet?
The clue to Palgue Chil Jang is in its character name:
Mountain.
A smaller clue is that there's only three different
combinations. And the first one starts with moving in a forward stance.
Another clue is that we've already covered all the major
areas of hand-to-hand fighting.
There is the expression "we have a mountain to
climb". But this is not about the mountain you have yet to climb, but the
mountain you have already climbed. It's a celebration of what you've achieved.
A kind of graduation ceremony.

The first combination is:
= N … ^ \ ?1 … FK
/ DSB … FK \ {High X block} … SK * ] KH
?1 = Moving in a forward
stance
FK = Front kick
DSB = Double side block
SK = Side kick

This is a summary of your karate journey so far. The first thing
you learnt was moving in a forward stance with your arms out to your sides
(?1). Your first kick was front kick (FK). And you learnt about blocks (DSB).
You practiced more kicks and some striking techniques (FK {High X block}). From
there you progressed to advanced kicks like side kick and advanced blocks like
knife hand.

The second combination is:
<270 E [ SB … {step out} \ rPb … lUB … rSK ] LKH … {step out} / lPb
SB = Side block
rPb = Right arm punch body
lUB = Left arm upper block
rSK = Right leg side kick
LKH = Low knife hand
lPB = Left arm punch body


The scenario is that the attacker is attacking with a
reverse punch – basic karate attack technique number 1. A side block ([ SB) is
used to counter this. This side block highlights that the student hasn't
initiated the conflict. There is "no first strike" here. The karate
techniques are being used for the intended self-defence.
The side block in back stance is the blocking strategy we
were advised to use against strikes in Palgue Sam Jang. (As an aside, blocks in
Japanese karate are called "uke". But this doesn't mean
"block", it means "receive". In a YouTube video [Uke],
Jesse Enkamp describes how Western martial artists often rely on brute force
for their blocks, but Japanese martial artists flow around a strike in a
relaxed and soft way. As such, the word "absorb" might be a more
useful way to think about "uke". The blocking using back stance in
this kata nicely captures this principle. In fact, in the video you can see
very similar techniques demonstrated.)
Having blocked, the student reaches out with their right arm
to grab the attacker's left arm ({step out} \ rPb). The student pulls the
attacker towards them (the hikite of lUB) and does a forearm strike to the neck
(lUB). The student rotates their body anti-clockwise to move their right leg
behind the attacker (rSK) and drops them to the ground, first by pushing with
their right forearm (LKH) and then reinforcing this with a shove using their
left hand (lPb).
This is a relatively simple combination incorporating
various techniques that have been learnt in the earlier katas. It represents
where you are now as a competent karateka in your journey of learning karate.


The third combination is more complicated to explain:
<90 S \ {low X block} …
{twist to right then left} {high X block} …
{Right hand grabs and both hands pulled back to right hip} …
rPb …
{Right leg lifted up pivot <180 to face E landing in horse
stance _} …
{Right arm does downward block to the side} …
{Step out} \ lOC {=Left Outside chop} …
{Right leg crescent kick to left open hand} …
{Land in horse stance with elbow strike} …
v HF {=Hammer fist} …
v KH …
{step out} \ Pb *
The thing we immediately see is that this is much more
complex than any combination we have seen so far.
And that is really the only observation we need to make.
This is an example of your future. More advanced, more complex, more punishing
techniques to learn. The message of the kata is where you started, where you
are now and where you should carry on to.
Except there is one little observation we should make, so
let's dig into what's happening here.
The student starts with an X block to the attacker's front kick
({low X block}). Clearly a more aggressive attack and, again, definitely
"no first strike" here. The student pulls their hands to their right
side, dragging the attacker's leg. This forces the attacker to lean forwards.
The high X block is to the attacker's neck, which is grabbed by the right hand and
pulled down to the student's right hip ({Right hand grabs and both hands pulled
back to right hip}).
The student thrusts out with their right arm over the
attacker's back to grab the attacker's belt or something similar (rPb). This
helps control the attacker and provides tactile feedback about where the
attacker's body is for the next move. The student holds the attacker's right
arm on their left hip with their left arm (thus controlling the attacker) and
powers their knee into the attacker's chest ({Right leg lifted up pivot <180
to face E landing in horse stance _}). In the kata this is a large movement. It
is unlikely to be in real life because the attacker's body is in the way. The
message of the 180° turn is that this is a high energy, high impact move. That
energy is intended to go into the attacker's chest. The right arm helps with
the strike because all the student has to do is bring, with force, their right
knee to their right elbow. It can be done with the eyes closed. Not requiring
visual feedback means the technique can be performed more reliably and with
more accuracy.
The kneeing to the chest is repeated until the attacker
drops to their knees ({Right arm does downward block to the side}). The student
grabs the attacker's hair or similar with their left hand and drags them to
their left side ({Step out} \ lOC).
The student steps around the attacker with their right leg ({Right
leg crescent kick to left open hand}) and lands to give an elbow strike to the
head (ES _).
The student pushes the attacker away (v HF) and then
retreats maintaining their guard (v KH).
Next we have a punch body ({step out} \ Pb). But this move
serves no obvious purpose. The student has already disengaged from the
attacker.
This is the "little observation". Why is it there?
For a while now we've known that punches are not always punches. What can this
punch mean? The closest thing we have to it is the punch head in the second different
combination of Palgue Sam Jang. If you recall, this punch means "keep
going". In that case it means "keep going, attacking the head /
neck". This punch in Palgue Chil Jang also means "keep going".
But this time it means "keep going, learning new techniques and
skills". In that sense this punch is the most important technique in the
entire kata series.
Palgue Pal Jang
Hold on…
Um, this is embarrassing… we've covered all modes of fighting
and even had our graduation ceremony but there's one more kata!

Does the first couple of moves of Palgue Pal Jang give us
any clues? The combination is:
= N … <90 W \ DB …
{twist left hand anti-clockwise} …
{draw back left foot} …
{Move left fist to right hip, to right shoulder, to centre then
down} …
^ / Pb

The twisting of the wrist is a good and well recognised technique
for breaking out of a grabbed wrist.
What about the rest of the combination?
Another way to break out of a wrist hold is to do a big
circular motion. Small or big will do fine, but there is no middle ground. The
rotation of the whole arm fits the bill nicely ({Move left fist to right hip,
to right shoulder…}).
Two techniques for breaking out of a wrist hold… then we have
a rather boring punch body. Well, we know that punch bodies are rarely push
bodies. It could be a good solid shove like we have seen elsewhere. But that's
hardly martial arts Gold.
So let's try pushing something else. After pushing and
poking various bits on a fellow karateka playing the role of the attacker you
may find that if you pull back your held arm, thus straightening the attacker's
arm (the hikite of the punch), on the inside of their elbow towards the outside
there's a pressure point that you can press that causes the attacker to let go.
Or you can just whack it.
Three techniques for breaking out of a wrist hold. They can
be used in isolation or consecutively if one of the other techniques fails to
work.


The second different combination
is the longest in the whole kata series. It even includes a change of
direction.
The scenario: The attacker is holding a stick or long samurai
style sword in their right hand.
The combination:
<90 N [ KH …
^ FK \ SH …
<180 {Feet rotate in position} {Right hand open on back of right
leg} …
<180 \ {Left arm swings in horizontal plane, fist closed, ending
up North} …
^ N / Pb …
<270 E [ {Outside chop to neck} …
{Elbow strike to neck} …
SB …
{Step out} \ rPb …
{Left leg sweeps to right knee} {Both hands to right hip} …
{Both hands to left hip}
KH = Knife hand
FK = Front kick
SH = Spear hand
SB = Side block
(turn 270° left)
The opening knife hand (KH) pushes the stick or sword to the
side. The student steps in with their right leg while grabbing the attacker's right
wrist with their left hand (FK SH). Continuing to move in, the student rotates
anti-clockwise (<180 etc.) to end with their back to the attacker, placing
their right hand on the attacker's right wrist. The student's little finger is
positioned on the attacker's hand side of the grip. This is captured in the
kata by the karateka's little finger being placed on their leg.
The student continues to rotate anti-clockwise (Second
<180 etc) to give a strong hammer fist blow to the attacker's head. The
primary purpose of this is to act as a stun for the next move.
We have another punch body (Pb). Once again, it's not a punch
body but in this case a large sleight of hand. In place of the simple punch the
student raises up the attacker's right arm (with their right arm) and rotates their
body clockwise under it so that they end up with their left leg and left hip
just behind the attacker. The student has control of the attacker's right arm
in front of their body and their left arm is across the attacker's face ({Chop
to neck}). The student puts pressure on the attacker's right elbow and uses elbow
strikes to the attacker's face ({Elbow strike to neck}) to encourage them to
drop the stick. The elbow strikes to the face also encourage the attacker to
turn their head away from the student. This makes it harder for the attacker to
use their free left arm against the student.
Once the student has motivated the attacker to discard the
stick, the student needs to discard the attacker. They bring their left hand to
their right hip and then push back with the forearm onto the attacker's chest
(SB) and assist this by twisting their body anti-clockwise and pushing with
their right arm (\ rPb). As the attacker topples backwards over the student's
left leg, the student lifts the attacker's right foot or knee and grabs it with
both hands ({Left leg sweeps to right knee} {Both hands to right hip}). The
attacker is discarded by pushing their foot to the student's left ({Both hands
to left hip}).
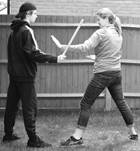
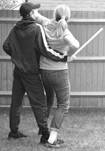
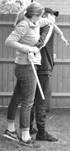
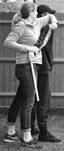
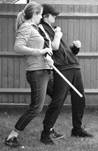
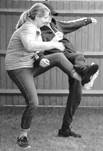
After drawing in the right
foot, a number of combinations are performed while moving in the same southerly
direction. To start with we have the following combination:
{Feet side-by-side} {Body
facing West} {Head turned to the left facing South}
{Left arm out to the left, palm open, little finger
down} …
{Side Kick along the line of the arm} …
{Land in front stance} …
{Elbow strike} …
{Left leg sweep up} {Both hands to right
hip} …
{Both hands to left hip}
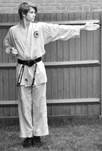
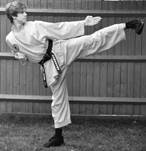
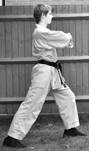
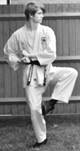
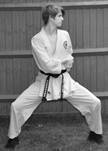
So far in this kata we've had techniques against a hold and
a technique against a weapon. Let's see if this combination is also a technique
for a hold or a weapon. Let's start by seeing if it is a technique against
another hold. What else can be held? A leg? An arm? Maybe the head?
Let's explore the case of a head lock. The student's body is
behind the attacker with their head under the attacker's right arm.
The student starts by placing their left arm in front of the
attacker ({Left arm out etc}). (Pulling with their right hand on the attacker's
hold around the neck is also recommended.) The student places their left leg
behind the attacker ({Side Kick along the line of the arm}) and pushes the
attacker over their outstretched leg with their left elbow, reinforced by their
right arm ({Elbow strike}). As the attacker topples backwards they will
hopefully let go of the student's head so they can use their arms to break
their fall. As before the student can sweep up the attacker's right foot or
knee ({Left leg sweep up}), grab it with both hands ({Both hands to right hip})
and then push it backwards ({Both hands to left hip}) to discard the attacker.
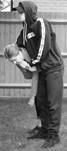
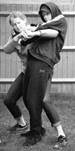
A similar combination is executed on the other side (facing
north), but a new combination is started before the sweep part is performed
(showing that the sweep might not be required).
After the elbow strike both
hands are brought to their respective hips, fingers up, as in:
N / {Fists on hips, fingers up} …
{Back leg moves to right} …
<180 S \ {Arms head height, fists a foot apart,
fingers down} …
{Body twists to right as both fists moved to right hip} …
{Body twists back, both fists punch upwards to body, fingers up} …
{Fists drawn back to hips} …
^ / {Arms head height, fists a foot apart, fingers down} …
{Body twists to left as both fists moved to left hip} …
{Body twists back, both fists punch upwards to body, fingers up}
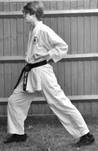
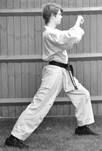
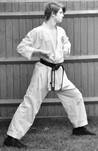
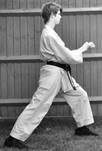
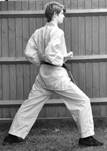
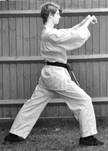
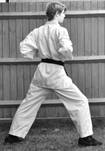
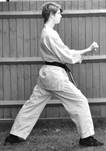
Is it for a hold or a weapon? The student is able to turn
around so unlikely to be a hold. As we think this kata is about holds and
weapons, let's consider the idea that this combination is for a weapon.
As the student turns around, we assume this time that the
attacker is initially behind the student. The student raises their arms, so the
weapon must be high. In conclusion, the attacker has a stick or similar weapon.
The stick is held high in the air with both hands – something an attacker
probably wouldn't do if they were in front of the student.
The student turns ({Back leg moves to right} <180 etc),
raising their arms, so the student's forearms block the attacker's forearms,
stopping the attacker crashing the stick down on their head ({Arms head height,
hands a foot apart}...). They deflect the attacker's arms to their right if
they are unable to stop it entirely ({Body twists to right as both hands moved
to hips}). The student performs a double punch to the attacker's body ({Body
twists back, both fist punch upwards to body}). Or maybe not! Even a pair of
strikes like this is unlikely to be conclusive, and the attacker will still be
left with control of the stick. Instead the student rotates their wrists (so
the fingers are up) and attempts to grab the attacker's arms or sleeves. Once the
student moves in close and pulls down to neutralise the threat of the stick
they can think of some other technique to perform from a more equal predicament.
If the attacker isn't controlled and is able to raise the
stick for another strike the sequence is repeated again, this time deflecting
the attacker's downward blow to the left in anticipation that on the second attempt
the attacker will try to prevent a deflection to the right. ("Resistance
into assistance" again.)
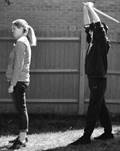
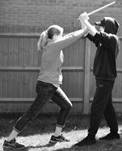
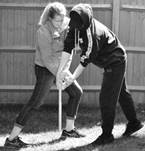
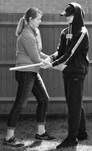

Nearly there. Just a few more
combinations to go…
^ [ {Left arm
inside chop to neck} …
{Left arm rotated clockwise down} …
{Back leg rotates backwards so karateka rotates 180° clockwise} …
{End rotation in horse stance} …
{Both fists of respective hips}
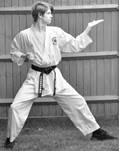
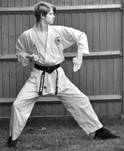
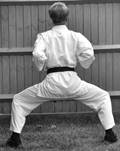
Same question as before: hold or weapon? We zigged last time
so let's zag this time. Let's assume a hold. We've already had a head lock
scenario, so these are on the syllabus. Are there other head locks we could
consider?
This time, rather than being behind the attacker, the
student could be in front, with their head under the attacker's left arm.
The student places their left leg behind the attacker (^ [).
With their left arm they reach up to the attacker's face ({Left arm inside chop
to neck}) - remember that the student's body is in a different orientation in
the application than in the kata - and push the attacker backwards and down ({Left
arm rotated clockwise down}). If the attacker is being stubborn this is an
opportunity for some eye gouging and nose grinding. As they push the attacker's
face, they reach up with their other hand to grab the attacker's hair. The
student pivots round clockwise to pull the attacker to the ground ({Back leg
rotates backwards so karateka rotates 180° into horse stance} & {Both hands
of respective hips}).
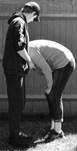
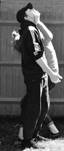
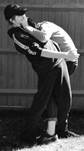
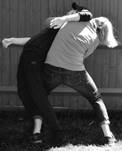

For the next combination we
have:
N {Feet together}
…
{Both arms moved outwards then upwards to above the head} …
{Hands moved down in front of the face and body to the groin area}
…
{Left leg moved out dropping into horse stance} {Arms raised up}
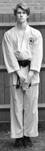
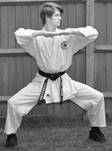
The student finds themselves in a hold again. This time they
are standing up and the attacker is behind them. The hold is a bear hug. The
attacker's arms are around the student's chest.
The combination starts with the feet together with the
karateka facing North. The student raises their arms ({Both arms moved outwards
etc}) and threads them inside the attacker's grip ({Hands moved down etc}). (If
the student's arms are already inside the attacker's arms this step is
obviously skipped!)
The student steps to the left and drops down while raising
their arms to break and escape the attacker's grip ({…dropping into horse
stance} etc.). The student is hopefully free, but the situation might morph
into that of the next combination.
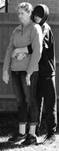
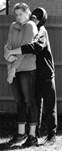
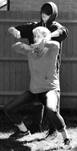
For the final combination the
karateka is standing with feet together facing North again:
N {Feet together}
…
{Right arm punches over left shoulder} …
{Shuffle to the right} …
{Left arm punches over right shoulder} …
{Shuffle to the left} …
{Right arm punch over left shoulder}
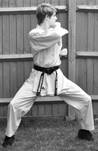
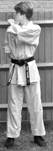
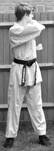
The poor student is in yet another head lock. This time the
attacker is standing behind the standing student with their right arm around
the student's neck.
The student reaches up with their right hand to grab a
finger or thumb on the attacker's right hand ({Right arm punches over left
shoulder}). The student pulls the attacker's arm down (the hikite part of {Left
arm punches over right shoulder}) and attempts to strike the attacker in the
face with their left fist ({Left arm punches over right shoulder}). If the
attacker moves their head to the other side, the student attempts to strike
that side also ({Right arm punch over left shoulder}).
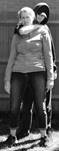
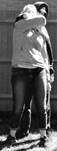
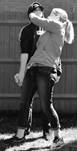
As you can see, this kata is about holds and dealing with
some weapons. These techniques are covered extensively in Jujitsu. For this
reason I sometimes refer to Palgue Pal Jang as the Jujitsu kata. This may also
explain why this kata is after the "graduation" kata. It represents
progressing on to studying different types of martial art.
Palgue Yi Jang
Returns
I skipped describing Palgue Yi Jang earlier. The reason is
that the interpretation is a bit "Zen". If I had launched straight
into describing it I fear you might have decided it was a fudge and given up on
the journey. Better, I thought, to jump into the bish, bash, bosh of Palgue
Sam Jang whose interpretation is undeniably about fighting.
But, as I hope to convince you, Palgue Yi Jang is an essential
part of the syllabus, and if a wise grand master had explained it to you, I'm
sure you would have accepted the interpretation.
The main combination is:
= N … <90 W \ UB … FK / Pb
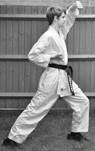

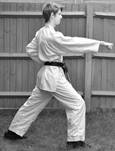
This basic sequence is repeated in the kata six times. Sounds
important.
There's three techniques: Upper block (UB), Front kick (FK)
and Punch body (Pb).
From Palgue Sam Jang we now know about the use of upper block.
It's used to strike the neck and head area.
In this case, punch body speaks for itself. For once it's
actually a "punch body"!
The front kick is an interesting one. In the performance of
the kata it is usually executed as high as the karateka's flexibility allows.
However, many karate practitioners recommend not using high kicks in real
conflict unless you are really good. Really, really, really good. They say, if
you hold your hands down by your sides, don't kick above your fingertip height.
Personally, I think this can be relaxed slightly. A kick to the groin might be
slightly higher risk, but it also offers a big return if successful. In my mind
the nature of the typical karate front kick, with the quick out and back flick
from the knee rather than the more powerful variant where you lift the knee
high to the chest then stomp forwards, supports this. The knee is also a valid
target for a kick.
We now have the evidence we need to understand this
combination. There is a strike to the head or neck, followed by a strike to the
groin or knee, followed by a strike to the body.
The rapid change of distances between the techniques doesn't
make sense for a sequence of moves in a fighting situation, especially if we
remember that we are expecting someone who is only learning their second kata
to execute them.
What is the kata trying to tell us? These are the three main
target areas that you should use in fighting: head / neck, groin / knee and
body. In that order of priority.


The other two combinations need to be looked
at together to be understood. They are:
<90 N [ LKH … ^ ] KH … ^
\ UB … ^ / Pb
and:
<90 S [ HF … ^ ] RSB … ^
[ MB … ^ / Pb
Where:
LKH = Low knife hand
KH = Knife hand
UB = Upper block
Pb = Punch body
HF = Hammer fist (like low knife hand but with fists closed)
RSB = Reinforced side block
MB = Middle area block
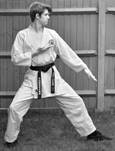
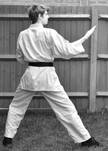
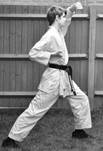
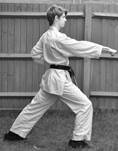
and:
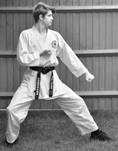
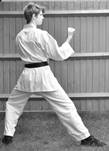
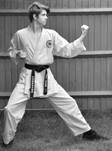

Both combinations go "low", "middle",
"high" (followed by the punch); the three different target heights
previously mentioned. Is that coincidence? Let's look closer.
The hammer fist is a minor variation of the low knife hand,
except that the fists are closed instead of open.
The reinforced side block in back stance is a variation of the
regular knife hand. A slightly bigger variation than the hammer fist to low
knife hand as it turns out.
The middle area block in back stance is an even bigger
variation of the upper block. It's a sufficiently big variation that it
actually ends up attacking the other side of the neck but it is still an attack
to the neck and head.
The message of these two combinations taken together is that,
while the kata may include one particular technique for a purpose, you should
be open to using other techniques to achieve the same result. Even to the point
where, when attacking the neck, you can resort to executing the equivalent of a
middle area block in back stance in place of an upper block.
The final move in the two combinations is the punch body.
Every other move in the pair of combinations is matched with a variation of the
technique. The kata authors could have easily used a spear hand as the final
technique in the second combination if they had wished to continue this theme.
But they didn't. So what are they trying to tell us?
If the earlier techniques in the combinations were different
then the punch bodies presumably are different also. In other words, punches
can mean different things – as we have already learnt.
Thus, Palgue Yi Jang is a kata on Principles and Concepts. If
you work in a technical field you are likely to read books that contain an
introduction at the start with a simple overview – the role played by Palgue Il
Jang in our case – and then a chapter on Principles and Concepts. Palgue Yi
Jang fulfils that role. The books then move onto the meat of the subject as
does the rest of our kata syllabus.
Such books will also include Conclusions – represented by
Palgue Chil Jang in our case – and often an epilogue or details for further
reading – just as we have with Palgue Pal Jang.
Thus we see that the Palgue kata series has the perfect
structure for a technical manual and Palgue Yi Jang is an essential part of
that structure.
Conclusion
Congratulations, you have now looked at the applications of
all the katas in the Palgue series.
We first looked at a simple kata that required no punching
skill. We looked at katas for different ranges of standing combat and a kata
for ground work. These were followed by a kata celebrating our kata journey and
a kata on future techniques.
From this I hope I have been able to convince you that the
Palgue kata series forms a syllabus for a fighting system.
Here's one more thing for you to consider if I haven't
convinced you already:
As you know, each kata has a "character"
associated with it based on the Taoist I Ching Trigrams. (This is the reason
why there has to be eight katas!)
Palgue Il Jang is associated with the character
"Heaven". This reflects the security and serenity you find once you
have learnt some basic techniques to defend yourself.
Palgue Yi Jang has the character "Lake". A lake is
a beautiful thing but it can conceal mysteries. As you enter into the lake and
dive under the surface you will discover the mysteries contained within. Palgue
Yi Jang hints at the mysteries of the karate lake you are about to dive into.
Palgue Sam Jang is "Fire". This highlights the
ferocious striking techniques launched to the neck by this kata.
Palgue Sa Jang has "Thunder" – the crashing noise
that your opponent makes when thrown to the floor.
Palgue Oh Jang is associated with "Wind". Like the
body drops in the kata, wind can push you over.
Palgue Yuk Jang has the character "Water". When an
attacker is on top of you it is like how water wraps around you.
Palgue Chil Jang we have already mentioned. It is
"Mountain", celebrating the mountain you have climbed on your journey.
And finally, Palgue Pal Jang is "Earth"
representing what you can see having climbed the mountain. It hints at the
world you can see beyond and where you should continue to explore with further
study.
The syllabus starts with a simple technique that can be used
by relatively untrained people. It moves through techniques for fighting at
different distances. It even includes a Principle and Concepts section and a
graduation!
Most of the techniques presented are simple and unlikely to
be considered "Best of Class" by truly advanced martial artists. The
syllabus doesn't have many advanced techniques such as arm locks and close
quarter grappling. Personally, I think this is a strength. A simple technique
well applied in a moment of crisis by someone who might not be able to train as
much as they would like is better than an advanced technique applied badly.
The separate katas for each combat scenario means you can more
easily select a suitable combination to execute depending on the combat
situation. For example, you can think, "I'm now in a close quarter
standing situation so something from Palgue Oh Jang is likely what I
need." This is an easier process than if techniques from all scenarios
were jumbled across all of the katas.
Note that the moves from the final "Advanced"
combination of Palgue Chil Jang didn't include any moves from the rest of the
kata series; unlike the moves from the middle "Intermediate"
combination. This emphasises that the kata series is a learning tool. It is
like a phrase book for learning a foreign language. At first when you're
learning a foreign language you repeat phrases from the book. As you become
more skilled you create your own phrases and sentences that are not included in
the phrase book.
The emphasis seems to be on creating distance with a view to
escape rather than beating your opponent. As Funakoshi said in his Twenty
Guiding Principles of Karate [Twenty], "Do not think of winning. Think,
rather, of not losing." This is illustrated by Palgue Yuk Jang where all
the combinations that started on the ground end up in a standing position
rather than seeking control or choking out an opponent while remaining on the
ground.
Admittedly the attacks the katas envisage might be a
reflection of simpler times, when attackers were more likely to want to rob you
(and not interested in fighting specifically) rather than wanting to fight for
pure entertainment. That said, in neither case is the attacker particularly
interested in a running race. The attacker is only likely to chase you down if
they have a grudge. So another rule of self-defence – don't make unnecessary
enemies!
Ultimately there is no way of knowing how close the syllabus
presented in this book matches the applications intended by the original kata authors.
I would like to think they are close. All the pieces fit together so well that
it's hard to believe it is a coincidence. Like when doing a Sudoku puzzle, if
the numbers work for the horizontal, vertical and block then you can be
reasonably sure you have the correct answer without someone having to tell you
you are right.
If they are close to the original intent, or the original
authors intended something similar but different, I think we should have great
admiration for the genius of those authors. The nature of a kata, such as the kata
embusen and the limitations on the number of steps
in each direction, imposes considerable constraints on what can be conveyed,
and yet the authors have been able to describe a comprehensive fighting system
containing not only striking techniques but throws and even ground techniques.
The katas of course work wonderfully as tools for practicing
the basics of karate with their migration from using simple stances and
techniques to more advanced ones, and, as we know, they are a fantastic
resource for improving physical fitness, conditioning and flexibility.
Before I leave you I just want to re-emphasise that this is
just "an" interpretation of the katas. Obviously I'm inclined to
think it is rather a good one. But it's important to keep looking at the katas
to see what they can teach us. For example, the opening combination of Palgue
Sa Jang has about half a dozen interpretations that I can think of. Some are
exact matches to the moves in the kata, others have slight variations, but all
are valid and worth studying for their own merit. As such, at their most
abstract the katas can be looked at as a series of knots in hankies to act as
reminders for what an instructor can teach their students. We must be ever
mindful of the risk of a good bunkai interpretation becoming the "one true
bunkai" with the result that it limits what we can learn from the kata.
I hope you have enjoyed this journey into a deep and
alternative description of the Palgue series of katas.
And I hope that you will agree with me that we Korean karate
practitioners are very lucky to have the Palgue series as one of our primary
kata series.
Epilogue
As part of a 1st Dan grading Korean karateka are
expected to know one other kata in addition to the Palgue katas. In the case of
my association this is Chul Gi. It is a variation of the katas Naihanchi, Teki
Shodan and Kiba Dachi Shodan.
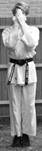
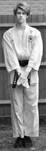
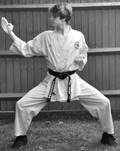
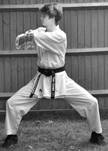
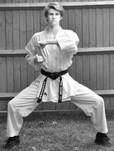
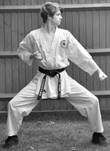
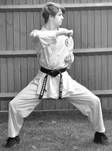
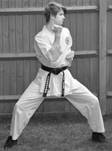
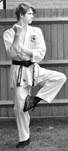
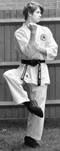
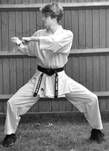

The student starts with the attacker to their right. The
initial goal is for the student to shuffle to the left sufficiently far that
they can turn and make an escape.
The kata begins with left hand over right hand in front of
the chest. The hands are first raised and then lowered to the groin. The
message here is to keep your right hand away from the attacker. If the student
is unable to make their escape they don't want their right hand to be grabbed. The
lowering of the hands will free the student if the attacker does manage to grab
the student's right wrist. The move would be executed swiftly but with little
effort in practice. The slow execution in the kata is used to indicate the "little
effort" aspect. Some karateka might consider this detail insufficiently
attacking to justify being part of a kata interpretation. There are certainly
other interpretations for it. But in my humble opinion it is an important thing
to be noted and so it is deserving of being represented in the kata.
The kata continues when the student fails to make their
escape and the attacker grabs the student's right shoulder with their left
hand. The student moves towards the attacker and places their right hand behind
the attacker's head. This is followed with an elbow strike to the attacker's
face or throat.
The student continues by grabbing the attacker's hair with
their left hand, first pulling the head across their chest, then down to their
left and finally back into their left hip. This circular motion, along with the
subsequent strike to the base of the attacker's skull, is designed to break the
attacker's neck.
The student moves left to position the attacker's head
centrally, not forgetting to take the opportunity to knee the attacker in the
face as they move, and punches up with their right fist into the face or
throat.
With their left arm, the student raises the attacker's head
up and pulls them to the right. The student does a trample kick to the
attacker's exposed right knee, drags the attacker to the left and trample kicks
to the attacker's left knee, thus breaking both knees.
The student discards the corpse by grabbing its hair with
their left hand and its belt or trouser top with their right hand and ejects it
to the left.
The kata is completed by repeating the sequence of moves on
the other side.
It is perhaps not surprising that this kata and its variants
are a favourite of many karateka.
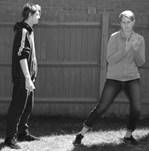
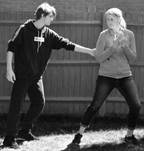
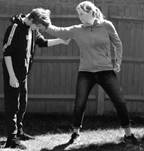
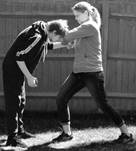
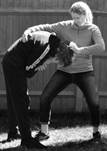
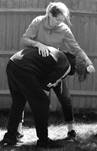
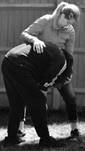
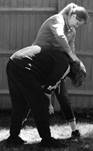
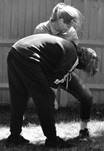
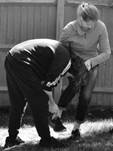
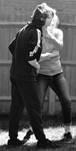
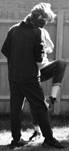
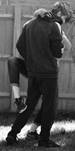
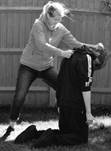
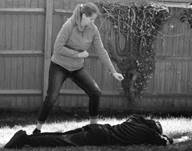
References
(Note: The links in this
section are also available at http://palgue-bunkai.org.)
[Abernethy] https://iainabernethy.co.uk/content/different-terms-used-bunkai
[Bunkai] https://en.wikipedia.org/wiki/Bunkai
[Enkamp] https://www.youtube.com/watch?v=q9kS4nOXPCI
[Funakoshi] https://en.wikipedia.org/wiki/Gichin_Funakoshi
[Itosu] https://en.wikipedia.org/wiki/Ank%C5%8D_Itosu
[Jutsu] Iain Abernethy. Bunkai-Jutsu:
The Practical Application of Karate Kata. Kindle Edition, ISBN 978-0953893218.
[Kyōhan] Funakoshi, Gichin
(translated by Harumi Suzuki-Johnston). Karate Dō Kyōhan: Master Text for
the Way of the Empty-Hand. San Diego, CA: Neptune Publications, 2012.
[Pinan] https://en.wikipedia.org/wiki/Pinan
[Rules] https://en.wikipedia.org/wiki/Kaisai_no_genri
[Twenty] Funakoshi,
Gichin, and Genwa Nakasone. The Twenty Guiding Principles of Karate: The
Spiritual Legacy of the Master. Kodansha USA, 2012.
[Uke] https://youtu.be/xMwyoSPVCP8?t=524